Crazy4Crafts- Crafts and Art Projects
Fun Art Projects and Crafts for Kids and Family
Pages
Categories
Batik
Crafts for All Ages
Crafts for Boys and Girls
Crafts- General
Cross Stitching and Free Cross Stitch Patterns
Easter and Spring Crafts
Gimp-Boondoggle-Scoubidou
Great Kids Craft Ideas
Holiday Crafts
Paper Dolls
Scrapbooking and Stamping
Stencilling and Stencil Theorems
Archives
August 2006
June 2006
May 2006
April 2006
Links
Blogroll
Ryan
JUNE 9TH, 2006
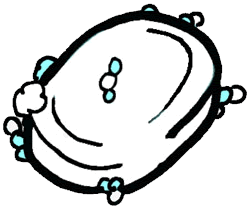
Easy Gift Soaps- Decorate Soaps for Gift- Great Kids Craft
We have doe this a few times- results are great. This makes an especially good kids craft to do as a group. Transparent soap works best- we got a ton cheap at bulk store. Also white looks nice too- what they don’t tell you in instructions is that you HAVE to get soap with no writing on indents on it- will really ruin the look.
The craft is from Familyfun.com. Found here: http://familyfun.go.com/arts-and-crafts/season/feature/famf117gift/famf117gift4.html
Basically you paint soap with an acrylic paint- use fairly good quality brushes to get any sort of detail. Wait for paint to dry and the brush melted clear wax over to protect. The wax really does work. We made soaps with our initials on and some funky colours for the bathroom. The who project took about an hour. “Painting” wax on soap I did- probably not best idea for younger kids to do. But thin coat of paraffin ( canning wax) works great- or an old white candle.
Search
Meta
Login
Valid XHTML
XFN
WordPress
Partners
Related Posts Free Cross Stitch Kit from DMC Threads- Sign Up to be A Cross Stitch Mentor! Easy and fun craft to use up old crayons- Try making a Batik! Plastic Lacing-Gimp-or Boondoggle – Scoubidou : Designs, Craft Ideas and Web Sites Posted by Administrator as Holiday Crafts, Great Kids Craft Ideas, Crafts- General at 12:10 AM EDT No Comments »
APRIL 13TH, 2006
Ukrainian Easter Egg Decorating- or Pysanky
This is one of the most satisfy crafts I have done. I started about 4 years ago. I went to a workshop run by a woman nearby and became immediately addicted! I did have difficulty finding supplies and ended up driving about 45 minutes to store that had a limited supply. At the time Micheal’s and other crafts stores did not carry any of the necessary supplies to do this fun Easter craft . The supplies were relatively inexpensive. And really only was a one-time purchase- even the dyes I have used for last 3 years. I think all told I spent about 50+ dollars on everything and was a great investment.
Pysanky uses a simple wax-resist process. You start with the lightest color – this will be white, if you use a white egg. Everything that you want to remain white, you cover with wax, using the kistka (the stylus). Then, you dye the egg – the next color is generally yellow. Wherever there is wax, the yellow dye will not be able to penetrate. Now that the egg is yellow, you mark with wax all the parts of the design that you want to remain yellow. The eggs are generally dyed successively in colors from lightest to darkest. In the end, you will have an egg with a great deal of wax on it – if black is your finishing color, you will end up with a virtually black egg. Then, using the side of a candle flame, you melt away all the layers of wax, revealing the colors that were protected underneath.
You will need:
kitskas ( these are like a stylus that holds the wax-always beeswax.
eggs: give them a vinegar mixed with water bath to have them clean and this will help them take the dye better.
beeswax. You can buy small blocks or cups of these made for pysanky or just cut off small block.
pencil: to draw your design if you like.
dyes: These are NOT Easter egg dyes you buy at supermarket. There are special dyes. They are quite vibrant and can be used for a couple of years if stored. I store mine in mason jars. Follow direction carefully when mixing.
candle: a small stubby candle that you keep lit- you put metal end of kitska into it to heat up enough to scoop beeswax. Some pysanky beeswax is dark when you buy it ( so you can see it on egg) or if using regular beeswax it will darken with use.
optional: pysanky patterns ( I prefer freehand and so do kids) elastic bands ( the think kind) around the egg allow you to draw perfect straight lines.
Paper towel- lots of this to “rub”beeswax off the egg when you are done.
miniwax clear urethane – glossy: when eggs are done this makes eggs nice and glossy and helps protect.
Step 1: Mix dye according to instructions. Lay out dyes in order of lightest to darkest.
Step 2: Wash eggs- they will hold dye better.
Step 3: Have your kitksa, candle lit and beeswax in front of you- I do over newspaper to catch the broken wax. Heat the metal tip of kitska in the candle, the scoop into beeswax. Quickly draw “pattern” onto white egg. Wherever the wax goes- your egg will be white. repeat as needed.
Step4: Put egg in dye- let sit in dye ( probably yellow) for about 2-3 mins. Dry off with paper towel or similar. Now go back to your station and use kitska. Wherever THIS wax goes will be yellow in colour.
Keep going in this manner til you get to the last colour which is usually dark purple or black.
The egg will probably be covered in wax. Use your candle and heat the wax coating egg enough so that you can wipe off with paper towel- this takes a while and require patience! Some people will use a small drill in each end of egg and blow out yolk. You can also buy special blowers. A traditional method is just to let dry out. This is what I do- with no problem- the inside just dries up no problem. You can shellac the egg with glossy clear varathane. They look great!
A kid\’s guide to decorating Ukrainian Easter eggs
Making Ukrainian pysanky
Making Ukrainian pysanky
European pysanky
European pysanky
How to decorate beautiful Ukrainian Easter eggs \”pysanky\”How to make Ukrainian pysanky
Good Pysanky Links:
Related Posts
Paper Dolls- Download Free Paper Dolls Online
Posted by Administrator as Holiday Crafts, Easter and Spring Crafts at 12:19 AM EDT
No Comments »